

Willy Wonka and the Chocolate Factory was, without a doubt, one of my favorite childhood movies. In fact, it might have been the movie that kindled my love of candy. I’ve done a Wonka Candy Drip Cake in the past, but today, I give you a gravity defying Willy Wonka Illusion Cake.
There are a few recipes you’re going to need to help you achieve this massive Wonka cake. You’re going to need 9 (you read that right…9!) white chocolate mud cakes, buttercream frosting, and ganache. Feel free be as creative with this cake as possible!
And also - you can make this in your WONKA F’Oodie Reversible Snug Hoodie!
Instructions:
- Carve your cakes. Level off the top of the cake with a sharp knife. Flip it over, and use a serrated edge knife to trim the browned bottom section. Trim the outside edges of the cake, as well. Then, use a cake leveler and cut the cake in half. Keep one half and set aside. Repeat with the rest of your cakes. (TIP: chilling the cakes for about an hour in the fridge/freezer before you begin carving your cake makes it easier to work with).
- Using a baking brush, brush on your simple syrup (hot water + sugar) directly onto the tops of the cakes. Paint closer to the outside edges to prevent the cake from drying out.
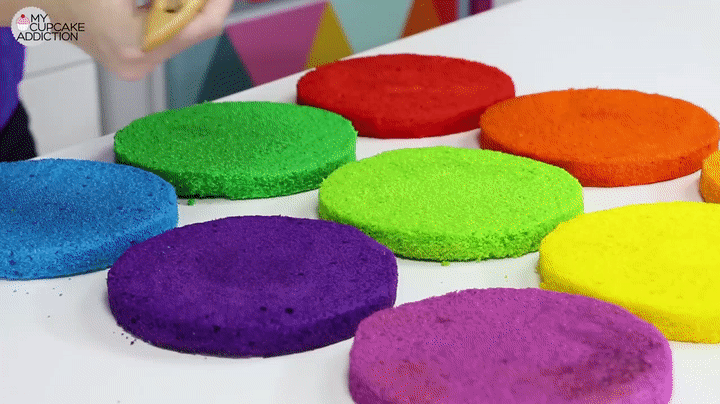
- Add a thin layer of buttercream frosting to the top of each of the cakes to create a thin crumb coat.
- On the cake board, stack whichever color you want on the top of your cake first on the bottom of your cake board (you’ll be flipping the cake later). Apply more buttercream and spread evenly. Repeat with your next two colors.
- Place four thick straws down into your cake. Cut them with a pair of scissors, and then press them down so that it’s level with your top layer. Wrap a small piece of cake board with tin foil. Place that on top of your third colored cake and frost it in. Continue frosting and stacking three more layers of cake.

- Repeat the previous step until you’ve reached the top of your cake. The top piece of cake does not need the foil wrapped cake board, but does need the four straws. Refrigerate your cake for an hour (or longer if you can!).
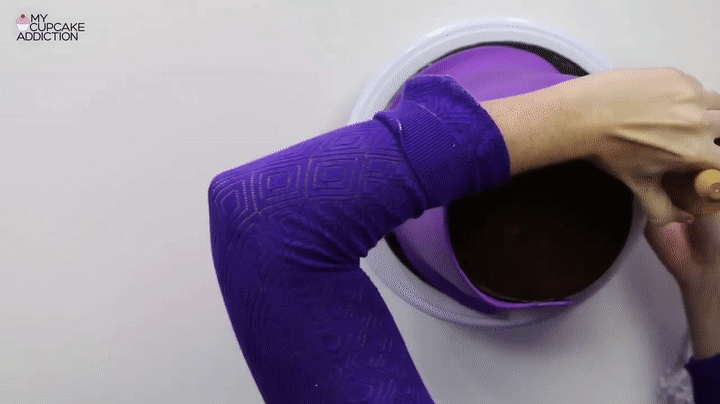
- Sprinkle some powdered sugar on your bench, and roll out your dark purple fondant so that it’s fairly thin. Brush some water or simple syrup onto a large dinner plate and lay your fondant neatly over the plate. Smooth the fondant down, and then tuck it around the edges. Use a pair of scissors to cut off any excess. Place a small bowl in the center, and flip the fondant over. (TIP: do this step a day in advance to let the fondant set and to avoid finger marks).
- Sprinkle powdered sugar onto your bench and roll out your green fondant so that it’s thin. Brush the large cake board with water or simple syrup, and lay the fondant over the board. Use a knife to cut off the excess fondant and clean up the sides.
- Cut out your Willy Wonka “W” template. Sprinkle powdered sugar on your bench, and roll out your white fondant. Using an exacto knife, cut around that template. Fix any edges as needed.

- Place a plate on top of your set cake. Use a serrated edge knife to carve around the top 3 or 4 layers of the cake. Use the plate on top as a guide for your circle. The top of your cake should be about 1 inch- 1 ½ inches smaller than the rest of your cake.
- Spread your chocolate ganache over your cake, and cover it entirely. Then, use a metal ruler or cake scraper to smooth out that ganache frosting. Then, dip your ruler in boiling water, and scrape along any lines to remove the imperfections. Smooth out the very top of the cake, as well. Transfer to the fridge for no longer than 30 minutes.
- Wrap your lightweight chocolate bar in silver foil. Tape a piece of gold foil paper. Put a small piece of tape on the bottom of the gold foil and stick it on to each side of the chocolate bar. Flip the 2 gold foil pieces back and place the candy bar on a piece of parchment paper on a slight angle.
- Place your chocolate candy melts in a snap seal bag, and cut off a bottom corner tip with scissors. Put a thick line of candy melts directly on the back of the chocolate bar to secure it in place Then, put chocolate candy melts on directly on the front of the chocolate candy bar. On the parchment paper, outline what looks like a chocolate waterfall. Fill in the outline with your candy melts with swirl and drip looking textures. (TIP: The waterfall should be more straight towards the bottom, as that will go directly into the cake later). Let it set at room temperature.
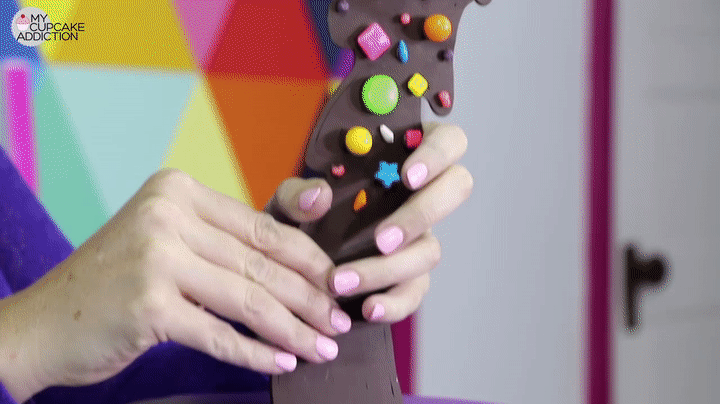
- Once set, turn your chocolate waterfall over. With your chocolate candy melts, glue assorted Willy Wonka candy to the top half of the back of your waterfall. Set aside.
- Sprinkle powdered sugar onto your bench and roll out your dark purple fondant. You don’t want this one to be that thin, but you have to make sure that it’s long enough to wrap around the circumference of your cake (you can use a sting to measure if you need to). Trim the edges and sides with a pizza cutter. Wrap the fondant around a rolling pin.
- Brush simple syrup directly onto your cake. Then, lift your rolling pin up onto the side of your cake. Carefully and quickly roll it out. Run your hands up and down the outside edges to smooth it off. Take a sharp knife and cut away any excess. Use a pizza cutter to trim any excess from the bottom of the cake, and a pair of scissors to trim away any excess from the top of the cake. Use a cake smoother to smooth out the fondant and remove any air bubbles.
- Spread chocolate ganache on the top of your cake. Do not spread it too close to the outside edges. Take your fondant covered plate, flip it upside down, and place it on the center of the top of your cake. Smear a generous amount of ganache to the bottom of your plate, and place the green fondant presentation board on top.
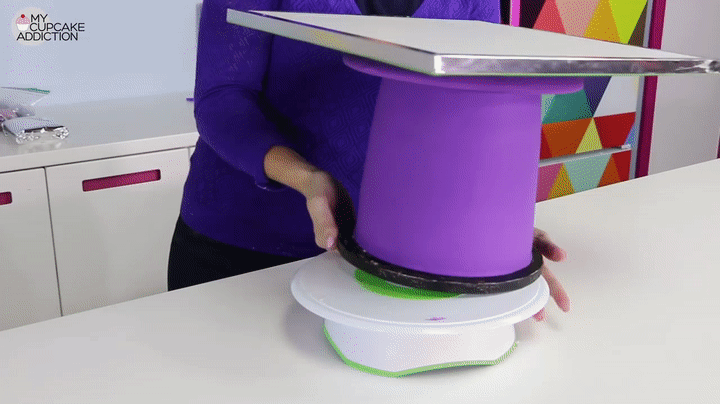
- Place a hand on the top and bottom cake board. Quickly and carefully, flip your entire cake upside down, and place it gently on the bench.
- Use a sharp knife to remove what is now considered the top of your cake. Slide the knife under the cake board to loosen and remove the cake board.
- Sprinkle powdered sugar on your bench and roll out a thick piece of dark purple fondant. Clean your bench and flip the fondant over. Put a plate that’s roughly the same size as the top of your cake onto the fondant. Use a pizza cutter to cut off the excess fondant from around the plate.
- Add a thin and smooth layer of ganache to the top of your cake. Don’t spread the ganache too close to the outside edges. Place your circular fondant disk on top of the cake. Smooth out the fondant as evenly as possible. Use a cake smoother if needed.
- Sprinkle powdered sugar onto your bench and roll out your light purple fondant. You want this piece to be very long and thin. Use a ruler to cut off the curved edges on the fondant. Pinch your light purple fondant to create a ripped effect.

- Take your “W” shaped fondant and flip it over. With a baking brush, paint some water lightly on the back of the fondant. Place it on your purple hat.
- With your baking brush, paint water around the base of the hat. Then, pick up your light purple rippled fondant and place it at the bottom of the cake so that the two sides meet together in the back. Trim any excess off the light purple fondant.
- Stick a sharp knife right through the top of your Wonka cake, and move the knife from side to side. Place your chocolate waterfall illusion directly into the cake. Slip your Wonka chocolate wrapper onto the chocolate piece on top.
- Sprinkle powdered sugar onto your bench, and roll out your brown fondant. You want this shape to be wider at the bottom and thinner at the top (somewhat triangular). Use the back of your pizza cutter to create textures into the fondant to look like a waterfall.
- Remove your cake from the rotating cake board. With a pastry brush, brush water onto the back of your cake where the brown fondant should be placed. Cut a straight line from the top of the fondant, and make sure the sides are not wider than the chocolate illusion. Place carefully. This should cover the seam in the back of your cake.
At this point you may decorate however you please! I will provide how I decorated my cake below:
- Print and cutout 2 copies of an oompa loompa. Glue them together with two toothpicks in between the two sheets. Place them near their legs.
- Roll a green piece of fondant into a circle. Use your scissors and cut into the top of the fondant to create a grass looking texture. Place directly on the board, and stick your oompa loompa into that grassy knoll. Place some candies around the base of that knoll.

- Place a colorful swirled lollipop off center through the top of the cake.
- Add patterned tape to the side of the cake board.

I really hope this cake is one that even Willy Wonka would be proud of! RIP Gene Wilder.
What You’ll Need:
- 9 white chocolate mud cakes (approx 7″x 1″)
- A double batch of buttercream frosting
- Food coloring
- Ganache
- Fondant (white, light purple, green, brown, dark purple)
- Simple Syrup
- Powdered Sugar
- Dark candy melts
- Lightweight candy bar
- 1 large lollipop
- Small Wonka candies for decor
- Sharp Knife
- Serrated knife
- Offset spatula
- Rolling pin
- Pizza cutter
- Metal ruler/cake scraper
- Cake leveler
- Cake smoother
- Thick milkshake straws for dowels.
- 2 small cake boards wrapped in tin foil
- Large dinner plate
- 10 inch round cake board
- Parchment Paper
- Baking Brushes
- Optional: Wonka Merch 😉
- Check out my WONKA range - you will love is as much as I do! https://bit.ly/WonkaGifts
-Subscribe to my YouTube channel for 2 new videos each week! http://bit.ly/MyCupcakeAddiction
-Follow me on Facebook for short snappy sweet ideas daily! http://on.fb.me/1cOOpu6
-Share your sweets with me on Instagram http://bit.ly/134thON Use the #mycupcakeaddiction so I can see them & I’ll re-share some of my favorites